Universal-Image-Loader源码解析
使用介绍
开源库特征
- 多线程下载图片,图片来源:网络、文件系统或项目文件夹
- 可配置度高:支持任务线程池、下载器、解码器、内存及磁盘缓存等
- 采用内存和磁盘缓存的两级缓存
- 支持多线程以及异步、同步加载
- 支持多种缓存算法实现
- 可以根据控件(ImageView)大小对Bitmap对象进行裁剪,减少Bitmap对象内存占用
- 较好的控制图片的加载,一般应用于Listview的滑动加载时机的处理
- 提供网络类型判断,支持较慢网络下加载
基本使用
初始化 1.1 添加完依赖后在Application或Activity中初始化ImageLoader
public class YourApplication extends Application {

    @Override
    public void onCreate() {
        super.onCreate();
        //创建默认的ImageLoader配置参数
        ImageLoaderConfiguration configuration = ImageLoaderConfiguration
            .createDefault(this);
        //Initialize ImageLoader with configuration.
        ImageLoader.getInstance().init(configuration);
    }
}
configuration表示ImageLoader的配置信息,这里使用了建造者模式,创建了一个默认的配置,此外我们可以手动配置,可以按照如下代码设置:
//个性化配置,建造者模式
 File cacheDir = StorageUtils.getCacheDirectory(context);
 ImageLoaderConfiguration config = new ImageLoaderConfiguration.Builder(context)
 .memoryCacheExtraOptions(480, 800) // 默认屏幕大小
 .diskCacheExtraOptions(480, 800, CompressFormat.JPEG, 75, null)
 .taskExecutor(…) //线程池
 .taskExecutorForCachedImages(…)
 .threadPoolSize(3) //
 .threadPriority(Thread.NORM_PRIORITY - 1) // 线程优先级
 .tasksProcessingOrder(QueueProcessingType.FIFO) //处理顺序,先进先出等
 .denyCacheImageMultipleSizesInMemory()
 .memoryCache(new LruMemoryCache(2  1024  1024)) //内存缓存
 .memoryCacheSize(2  1024  1024)
 .memoryCacheSizePercentage(13) // default
 .diskCache(new UnlimitedDiscCache(cacheDir)) // 磁盘缓存,自定义地址
 .diskCacheSize(50  1024  1024)
 .diskCacheFileCount(100)
 .diskCacheFileNameGenerator(new HashCodeFileNameGenerator()) // default
 .imageDownloader(new BaseImageDownloader(context)) // 下载器
 .imageDecoder(new BaseImageDecoder()) // 解析器
 .defaultDisplayImageOptions(DisplayImageOptions.createSimple())
 .build();
 ImageLoader.getInstance().init(configuration);
上面的配置选项可以根据我们实际需要进行添加 1.2 加载配置项 对于每次要加载的显示项在加载时也可以进行设置
DisplayImageOptions options = new DisplayImageOptions.Builder()
 .showImageOnLoading(R.drawable.ic_stub) //设置加载前默认图片
 .showImageForEmptyUri(R.drawable.ic_empty)
 .showImageOnFail(R.drawable.ic_error)
 .resetViewBeforeLoading(false) //加载前会清空图片
 .delayBeforeLoading(1000)
 .cacheInMemory(true) //开始缓存
 .cacheOnDisk(true)
 .preProcessor(…)
 .postProcessor(…)
 .extraForDownloader(…)
 .considerExifParams(false) // default
 .imageScaleType(ImageScaleType.IN_SAMPLE_POWER_OF_2) //类似imageview scaleType
 .bitmapConfig(Bitmap.Config.ARGB_8888) // 在要求不高时可以用555缩小内存占用
 .decodingOptions(…)
 .displayer(new SimpleBitmapDisplayer()) // 渲染器,可以加一些特殊效果,例如矩形圆角等
 .handler(new Handler()) // default
 .build();
1.3 Manifest配置 添加网络权限,提供读写磁盘权限 1.4 下载显示图片 两种方式:一种直接展示在显示控件中,一种下载图片进行回调
//直接展示 imageLoader.displayImage(imageUri, imageView); //下载回调 imageLoader.loadImage(imageUri, new SimpleImageLoadingListener() { @Override public void onLoadingComplete(String imageUri, View view, Bitmap loadedImage) { // 图片处理 } });至此就是UIL的简单使用情况,更为详细的使用可以参见夏安明的博文:Android开源框架Universal-Image-Loader完全解析(一)—- 基本介绍及使用 接下来将从源码的角度来分析UIL的使用
源码分析
UIL整个框架比较复杂,首先来看一下总体设计图
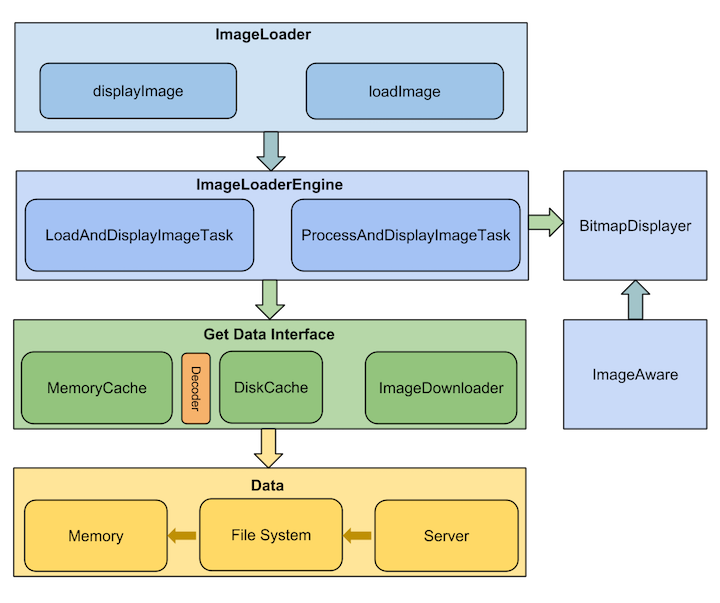 :
可以看到整个库分为五大模块,整体的工作流程就是:ImageLoader收到显示或加载图片的任务之后,将它交给ImageLoaderEngine,ImageLoaderEngine负责分发任务到具体的线程池中,任务通过缓存Cache和网络请求ImageDownloader来获取图片,在这期间有可能会对Bitmap对象进行处理以及解码,最终转换为Bitmap交给BitmapDisplayer显示在ImageAware控件中
下面的流程图更为直观的表示了整个过程:
:
可以看到整个库分为五大模块,整体的工作流程就是:ImageLoader收到显示或加载图片的任务之后,将它交给ImageLoaderEngine,ImageLoaderEngine负责分发任务到具体的线程池中,任务通过缓存Cache和网络请求ImageDownloader来获取图片,在这期间有可能会对Bitmap对象进行处理以及解码,最终转换为Bitmap交给BitmapDisplayer显示在ImageAware控件中
下面的流程图更为直观的表示了整个过程: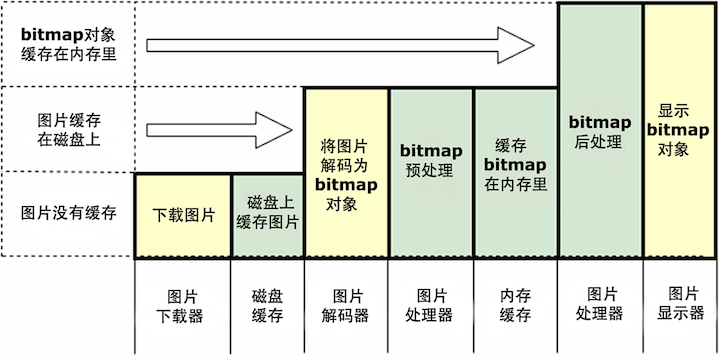
下面将从几个最为重要的模块进行详细分析
1.图片缓存
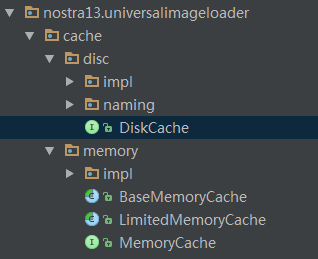
上图显示了库中缓存这块的结构,disc是磁盘缓存实现,memory是内存缓存实现 UIL采用三层cache机制来缓存图片(这里网络请求算不上cache),分级缓存的思想就是每次根据url请求图片时,都会首先访问内存缓存,内存中没有时,再从磁盘文件中查找,如果磁盘缓存文件中仍没有,这时再通过网络请求加载 UIL的内存缓存默认采用了LRU算法,即Least Recently Used近期最少使用算法,内部选用了基于hash表和双向循环链表的LinkedHashMap作为存储结构。这里对于LinkedHashMap将会在另一篇博文中详细从源码的角度分析,这里采用原理论述的角度来说明: 下面将借助LruMemoryCache.java的具体实现通过代码分段展开分析
注释:
A cache that holds strong references to a limited number of Bitmaps. Each time a Bitmap is accessed, it is moved to the head of a queue. When a Bitmap is added to a full cache, the Bitmap at the end of that queue is evicted and may become eligible for garbage collection.
从注释中可以清晰的看到,该类采用了强引用的方式引用一定数量的bitmap对象,每次有一个bitmap对象被访问,它将会被移到队列的头部。当一个bitmap对象被添加进一个空的cache中,队列尾部的bitmap对象将会被移除,将会被GC倾向于回收掉
LruMemoryCache实现了MemoryCache接口,该接口中定义了put、get、remove等方法用于子类重写操作cache中的对象,首先看一下构造方法
/** @param maxSize Maximum sum of the sizes of the Bitmaps in this cache */
public LruMemoryCache(int maxSize) {
    if (maxSize <= 0) {
        throw new IllegalArgumentException("maxSize <= 0");
    }
    this.maxSize = maxSize;
    this.map = new LinkedHashMap<String, Bitmap>(0, 0.75f, true);
}
该构造方法中实例化了一个LinkedHashMap对象,这里关注一下LinkedHashMap的三个参数含义:第一个参数为map容量,这里默认为0;第二个参数是负载因子loadFactor,表示已存和的数据容量和总容量的比值,采用小数表示,默认为0.75,当map中的数据量达到总容量的75%时,容量空间自动扩容原容量的一倍,不需要改动;第三个参数是访问顺序accessOrder,在平常创建LinkedHashMap实例对象时一般不指定该参数,其内部缺省构造方法会将其赋值为false,即按照插入的顺序创建循环链表,不会移动访问对象的位置。这里我们需要实现的是LRU算法,所以这个参数很关键,需要设置为true,这样就可以保证链表头结点head到尾节点tail的顺序按照“近期最少访问->近期经常访问”,即当访问某个对象时就会将其插到链尾,作为新的尾节点,对于指定头结点的双向循环链表而言,就是插入到头结点的前一个节点。这一点也可以从LinkedHashMap的注释上得到印证:
Entries are kept in a doubly-linked list. The iteration order is, by default, the order in which keys were inserted. Reinserting an already-present key doesn't change the order. If the three argument constructor is used, and {@code accessOrder} is specified as {@code true}, the iteration will be in the order that entries were accessed.The access order is affected by {@code put}, {@code get}, and {@code putAll} operations,but not by operations on the collection views.
接下来将从重写的map操作方法实现上来分析 1.get方法
/**
 * Returns the Bitmap for {@code key} if it exists in the cache. If a Bitmap was returned, it is moved to the head
 * of the queue. This returns null if a Bitmap is not cached.
 */
@Override
public final Bitmap get(String key) {
    if (key == null) {
        throw new NullPointerException("key == null");
    }

    synchronized (this) {
        return map.get(key);
    }
}
如果cache中存在所查找的bitmap对象,则直接返回,这里调用了LinkedHashMap的get方法,其内部实现就是将该对象移到队列的头部,这里既然讲到这里了,我们不妨去看一下LinkedHashMap的get方法内部实现:
@Override public V get(Object key) {
    /*
     * This method is overridden to eliminate the need for a polymorphic
     * invocation in superclass at the expense of code duplication.
     */
    if (key == null) {
        HashMapEntry<K, V> e = entryForNullKey;
        if (e == null)
            return null;
        if (accessOrder)
            makeTail((LinkedEntry<K, V>) e);
        return e.value;
    }

    int hash = Collections.secondaryHash(key);
    HashMapEntry<K, V>[] tab = table;
    for (HashMapEntry<K, V> e = tab[hash & (tab.length - 1)];
            e != null; e = e.next) {
        K eKey = e.key;
        if (eKey == key || (e.hash == hash && key.equals(eKey))) {
            if (accessOrder)
                makeTail((LinkedEntry<K, V>) e);
            return e.value;
        }
    }
    return null;
}
当查找的key不为空时,会调用Collections.secondaryHash(key)方法对key进行hash,从这个方法名我们可以猜测出是对key做了两次hash处理,那究竟是不是这样呢?接着来看一看:
/**
 * Computes a hash code and applies a supplemental hash function to defend
 * against poor quality hash functions. This is critical because HashMap
 * uses power-of-two length hash tables, that otherwise encounter collisions
 * for hash codes that do not differ in lower or upper bits.
 * Routine taken from java.util.concurrent.ConcurrentHashMap.hash(int).
 * @hide
 */
public static int secondaryHash(Object key) {
    return secondaryHash(key.hashCode());
}

private static int secondaryHash(int h) {
    // Spread bits to regularize both segment and index locations,
    // using variant of single-word Wang/Jenkins hash.
    h += (h <<  15) ^ 0xffffcd7d;
    h ^= (h >>> 10);
    h += (h <<   3);
    h ^= (h >>>  6);
    h += (h <<   2) + (h << 14);
    return h ^ (h >>> 16);
}
从上面的注释中即可看出是考虑到直接调用key的hashcode方法对于解决hash冲突的能力比较薄弱,所以又进行了一次移位处理的hash过程,这样做的目的就是尽可能的减少hash冲突的出现,具体这种移位的hash算法原理暂时留到后面再理解~
继续回到上面get方法的分析,在分析之前首先明确一点就是,LinkedHashMap中定义了一个HashMapEntry内部类,用来存储键值对,包含key、value、next和hash属性,LinkedHashMap内部维护了一个该entry对象的table数组,也就是其中的hash表数据结构,该table数组的索引逻辑上就叫做bucket(槽)。在得到key对应的hash值之后,通过tabhash & (tab.length - 1)找到索引位置的entry对象,然后从该entry对象开始遍历链表,这里采用了链地址法来解决hash冲突,即对于散列到相同槽位的entry对象以单链表的形式连接起来。如果key值相同,且accessOrder为false,则直接返回value值;如果accessOrder为true,则将查找的entry对象移到双向循环链尾,至此get方法分析完毕~ 2.put方法
/** Caches {@code Bitmap} for {@code key}. The Bitmap is moved to the head of the queue. */
@Override
public final boolean put(String key, Bitmap value) {
    if (key == null || value == null) {
        throw new NullPointerException("key == null || value == null");
    }

    synchronized (this) {
        size += sizeOf(key, value);
        Bitmap previous = map.put(key, value);
        if (previous != null) {
            size -= sizeOf(key, previous);
        }
    }

    trimToSize(maxSize);
    return true;
}

/**
 * Remove the eldest entries until the total of remaining entries is at or below the requested size.
 *
 * @param maxSize the maximum size of the cache before returning. May be -1 to evict even 0-sized elements.
 */
private void trimToSize(int maxSize) {
    while (true) {
        String key;
        Bitmap value;
        synchronized (this) {
            if (size < 0 || (map.isEmpty() && size != 0)) {
                throw new IllegalStateException(getClass().getName() + ".sizeOf() is reporting inconsistent results!");
            }

            if (size <= maxSize || map.isEmpty()) {
                break;
            }

            Map.Entry<String, Bitmap> toEvict = map.entrySet().iterator().next();
            if (toEvict == null) {
                break;
            }
            key = toEvict.getKey();
            value = toEvict.getValue();
            map.remove(key);
            size -= sizeOf(key, value);
        }
    }
}
如果key和value不为空,首先计算对应的bitmap对象的字节大小,累加到size上,然后调用LinkedHashMap的put方法,这里实际上调用的是HashMap的put方法,LinkedHashMap是继承于HashMap的,但是并没有重写HashMap的put方法,而只是重写了其中的addNewEntry方法,具体参见下面的代码:
//HashMap
 @Override public V put(K key, V value) {
    if (key == null) {
        return putValueForNullKey(value);
    }

    int hash = Collections.secondaryHash(key);
    HashMapEntry<K, V>[] tab = table;
    int index = hash & (tab.length - 1);
    for (HashMapEntry<K, V> e = tab[index]; e != null; e = e.next) {
        if (e.hash == hash && key.equals(e.key)) {
            preModify(e);
            V oldValue = e.value;
            e.value = value;
            return oldValue;
        }
    }

    // No entry for (non-null) key is present; create one
    modCount++;
    if (size++ > threshold) {
        tab = doubleCapacity();
        index = hash & (tab.length - 1);
    }
    addNewEntry(key, value, hash, index);
    return null;
}
可以看到倒数第二行调用了addNewEntry方法,这个方法在LinkedHashMap中是重写了的,下面会做相应分析。我们先来看一下put的实现原理,如果传入的key不为空,同样和get中分析的一样进行二次hash,找到entry对象所在的索引位置,即槽位。然后遍历链表,用新的value替换掉旧的value值。如果该entry对象不存在,就创建一个,首先判断容量大小是否超过阀值,若超过则容量加倍,并重新计算索引位置;接着就调用addNewEntry方法添加entry对象,下面就来看一下addNewEntry方法内部是如何实现的
//LinkedHashMap /** Evicts eldest entry if instructed, creates a new entry and links it in as head of linked list. This method should call constructorNewEntry(instead of duplicating code) if the performance of your VM permits. It may seem strange that this method is tasked with adding the entry to the hash table (which is properly the province of our superclass).The alternative of passing the "next" link in to this method and returning the newly created element does not work! If we remove an (eldest) entry that happens to be the first entry in the same bucket as the newly created entry, the "next" link would become invalid, and the resulting hash table corrupt. */ @Override void addNewEntry(K key, V value, int hash, int index) { LinkedEntry<K, V> header = this.header; // Remove eldest entry if instructed to do so. LinkedEntry<K, V> eldest = header.nxt; if (eldest != header && removeEldestEntry(eldest)) { remove(eldest.key); } // Create new entry, link it on to list, and put it into table LinkedEntry<K, V> oldTail = header.prv; LinkedEntry<K, V> newTail = new LinkedEntry<K,V>( key, value, hash, table[index], header, oldTail); table[index] = oldTail.nxt = header.prv = newTail; }首先明确一点就是LinkedHashMap内部同时维护了一个双向循环链表用于保存Entry对象,加入一个head头结点,将所有插入到该LinkedHashMap中的Entry按照插入的先后顺序依次加入到以head为头结点的双向循环链表中。根据LRU的算法要求当超出设定容量大小时会删除循环链表中近期最少使用的entry对象,也即header的next节点;之后将新添加的entry对象添加到链表的尾部,这里的实现有点奇怪,正常的情况应该是初始链表为header->entry1->entry2->header,当添加一个新的entry对象,这时会将其插入到链尾即header->entry1->entry2->entry3->header,如果超过最大尺寸则删除header的next节点,即header->entry2->entry3->header,但是我从代码的最后三行实现里发现似乎指向并未完全,可能这里未理解透彻? 这里顺便提到一种情况就是:如果新加入的对象entry3尺寸比较大,需要同时释放entry1和entry2才不会导致OOM的现象,那么就需要迭代LinkedHashMap不断判断内存是否足够,删除节点知道内存够用为止,示例代码如下:
private void checkSize() {
    if(size>limit){
            //迭代LinkedHashMap,内存不够,删除最早加入内存缓存的图片,判断删除后是否够用,不够用,再删。
            Iterator> iter=cache.entrySet().iterator();
            while(iter.hasNext()){

                Entry entry=iter.next();
                size-=getSizeInBytes(entry.getValue());
                iter.remove();
                if(size<=limit)
                    break;
            }
    }
}
接下来继续回到前面对于LruMemoryCache中的put方法分析,调用map.put(key, value)返回移除的旧value,如果不为空,cache的大小减去移除的bitmap对象的字节大小;当添加新的entry对象进来后,需要重新调整大小,调用trimToSize方法,该方法的作用就是Remove the eldest entries until the total of remaining entries is at or below the requested size.移除最老的节点知道全部保留的Entry对象大小在要求的尺寸范围内,至此对于put的过程也分析完毕~
总结分析 实际上LruMemoryCache是参照android.support.v4.util.LruCache的实现来写的,唯一的不同之处在于实例化LinkedHashMap对象时,
在UIL早期的实现版本,LimitedMemoryCache的子类都采用继承实现,且采用弱引用的引用方式,而这种实现方式现在已经不推荐了,为什么呢? 首先来看一下官方文档的说明:
Note: In the past, a popular memory cache implementation was a SoftReference or WeakReference bitmap cache, however this is not recommended. Starting from Android 2.3 (API Level 9) the garbage collector is more aggressive with collecting soft/weak references which makes them fairly ineffective. In addition, prior to Android 3.0 (API Level 11), the backing data of a bitmap was stored in native memory which is not released in a predictable manner, potentially causing an application to briefly exceed its memory limits and crash. In the past, a popular memory cache implementation was a SoftReference or WeakReference bitmap cache, however this is not recommended. Starting from Android 2.3 (API Level 9) the garbage collector is more aggressive with collecting soft/weak references which makes them fairly ineffective.
文档说的很清楚,也就是说从2.3之后软引用或弱引用所引用的对象GC会倾向于回收掉的,不再可靠了,所以对于这种情况已经意义不大了:内存缓存中设置一块限定大小的区域,比如说2Mbyte,当添加的bitmap对象尺寸大小已超过该指定大小,可以采用上面的LRU算法将近期最少使用的对象移出指定缓存区,采用弱引用的方式引用起来,当下次需要时可以直接从内存中获取,从一定程度上扩大了缓存,同时在手机内存紧张,GC的时候可以将这部分弱引用的bitmap对象回收掉;但是如上文档所述,弱引用的对象生存周期不会超过下次GC,也就是说GC会倾向于回收掉这部分引用的对象,所以弱引用的方式变得很不可靠,而且从这个角度讲的话,和直接将超出的对象直接丢掉没有太大区别了,所以我个人认为只采用强引用的方式引用指定大小缓存区的对象即可;还有一种思考方式就是,如果应用很多地方需要占用大量内存,可以考虑去除内存缓存这一级,直接将数据缓存到文件(磁盘),这样牺牲了一点速度,换取了一定的内存空间,可以根据应用的实际情况来进行取舍~
结语 对于磁盘缓存策略因篇幅原因不再做详细分析,实际上基本思想和内存缓存是一样的,也是采用的LRU的算法思想,当然根据具体的需求还有一些其他的算法实现,比如限制缓存最长存活周期等