Volley源码解析
Volley框架概述
Volley总体设计图
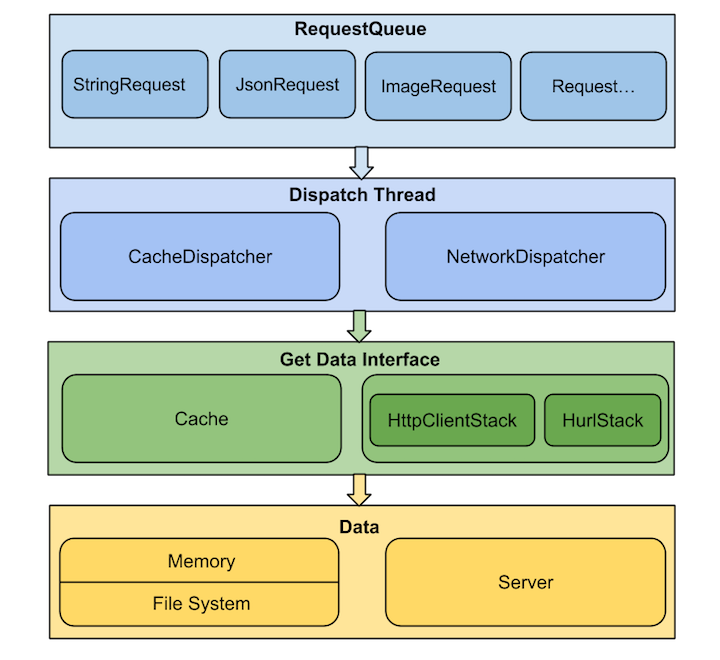
Volley的总体设计思路很清晰:主要通过两种不同的分发线程(CacheDispacher和NetworkDispatcher)不断的从请求队列(RequestQueue)中获取请求,这些请求都是继承于Request,可以自己根据实际需求进行定制,后面会提到;然后根据是否已缓存来调用Cache或Network两类数据获取接口之一,从内存或服务器获取到请求的数据,最后再由ResponseDelivery去做结果分发和回调处理。
Volley的主要特点
主要从优点和缺点两个角度来阐述 优点:这里参考StackOverflow上的介绍
1.The networking part isn’t just for images. Volley is intended to be an integral part of your backend. For a fresh project based off of a simple REST service, this could be a big win. 2.NetworkImageView is more aggressive about request cleanup than Picasso, and more conservative in its GC usage patterns. 3.NetworkImageView relies exclusively on strong memory references, and cleans up all request data as soon as a new request is made for an ImageView, or as soon as that ImageView moves offscreen. 4.Performance. This post won’t evaluate this claim, but they’ve clearly taken some care to be judicious in their memory usage patterns. Volley also makes an effort to batch callbacks to the main thread to reduce context switching. 5.Volley apparently has futures, too. Check out RequestFuture if you’re interested. 6.If you’re dealing with high-resolution compressed images, Volley is the only solution here that works well. 7.Volley can be used with Okhttp (New ver of Okhttp supports NIO for better performance ) 8.Volley plays nice with the Activity life cycle.
扩展性强。Volley大多是基于接口的设计,可配置性强 一定程度符合Http规范,包括返回ResponseCode(2xx, 3xx, 4xx, 5xx)的处理,请求头的处理,缓存机制的支持等。并支持重试及优先级定义。 默认Android 2.3及以上基于HttpURLConnection,2.3以下基于HttpClient实现 提供简便的图片加载工具 缺点(存在的问题):以下问题不支持,部分已解决
- Multipart Requests (Solution: https://github.com/vinaysshenoy/enhanced-volley)
- status code 201 is taken as an error, Status code from 200 to 207 are successful responses now.(Fixed: https://github.com/Vinayrraj/CustomVolley) Update: in latest release Google volley the 2XX Status codes bug is fixed now!
- it's less documented but many of the people supporting this volley in github, java like documentation can be found here http://files.evancharlton.com/volley-docs/
- To solve/change Redirect Policy of Volley Framework use Volley with OkHTTP (CommonsWare mentioned above)
Volley不适用于处理大文件的上传和下载,对此官方建议如下:
Volley is not suitable for large download or streaming operations, since Volley holds all responses in memory during parsing. For large download operations,consider using an alternative like DownloadManager. - 关于Volley中的图片加载 在分析具体的实现方式之前,首先来看一下ImageLoader实现图片加载的特点: 1、可以设置自定义的ImageCache,这里ImageCache是个接口,后面会详细说明。可以是内存缓存,也可以是磁盘缓存,将获取的图片缓存起来,可以复用以减少网络请求。默认源码里只实现了L2级缓存,没有实现L1级缓存,但是可以自己实现,后面也会具体讲解 2、可以定义图片请求过程中显示的图片和请求失败后显示的图片 3、对于相同请求(相同地址,相同大小),只发送一个,实现过滤重复请求
对于Volley中存在的三种图片加载方式,这里我们首先来分析采用ImageLoader来加载图片的方式: 为了辅助源码理解,这里先讲一下ImageLaoder的基本使用: 其过程分为四步:1、创建一个RequestQueue对象 2、创建一个ImageLoader对象 3、获取一个ImageListener对象 4、调用ImageLoader的get方法加载网络上的图片
这里直接将4步代码全部贴上:
//创建请求队列
RequestQueue mQueue = Volley.newRequestQueue(context);
//新建ImageLoader对象
ImageLoader imageLoader = new ImageLoader(mQueue, new ImageCache() {
    @Override
    public void putBitmap(String url, Bitmap bitmap) {
    }

    @Override
    public Bitmap getBitmap(String url) {
        return null;
    }
});
//获取ImageListener对象
ImageListener listener = ImageLoader.getImageListener(imageView,
        R.drawable.default_image, R.drawable.failed_image);
//调用get方法加载
imageLoader.get("http://img.my.csdn.net/uploads/201404/13/1397393290_5765.jpeg", listener);
//也可指定图片大小
imageLoader.get("http://img.my.csdn.net/uploads/201404/13/1397393290_5765.jpeg",
                listener, 200, 200);
那接下来我们从源码实现的角度来分析: 首先来看一下ImageLoader内部定义的几个属性:
    //RequestQueue for dispatching ImageRequests onto.
    //分发ImageRequest的请求队列
    private final RequestQueue mRequestQueue;

    //Amount of time to wait after first response arrives before delivering all responses.
    //在传送所有响应之前,第一个响应到达之后的等待时间
    private int mBatchResponseDelayMs = 100;

    //The cache implementation to be used as an L1 cache before calling into volley. 用于L1级缓存的cache接口
    private final ImageCache mCache;

    //HashMap of Cache keys -> BatchedImageRequest used to track in-flight requests so that we can coalesce multiple requests to the same URL into a single network request.缓存的key的hash值,也即请求url的hash值作为map中的key,BatchedImageRequest就是用来保证如果我们对同一个url重复发送了多个请求,可以将其过滤掉,合为一个网络请求
    private final HashMap<String, BatchedImageRequest> mInFlightRequests =
    new HashMap<String, BatchedImageRequest>();

    //HashMap of the currently pending responses (waiting to be delivered).当前挂起响应的map  等待被传输
    private final HashMap<String, BatchedImageRequest> mBatchedResponses =
            new HashMap<String, BatchedImageRequest>();

    // Handler to the main thread. 主线程的handler
    private final Handler mHandler = new Handler(Looper.getMainLooper());

    //Runnable for in-flight response delivery.
    private Runnable mRunnable;
内部定义了一个用于一级缓存的Cache接口:
    /**
     * Constructs a new ImageLoader.
     * @param queue The RequestQueue to use for making image requests.
     * @param imageCache The cache to use as an L1 cache.
     */
    public ImageLoader(RequestQueue queue, ImageCache imageCache) {
        mRequestQueue = queue;
        mCache = imageCache;
    }
前面步骤2就是采用该构造方法创建ImageLoader对象 获取ImageListener对象
    /**
     * The default implementation of ImageListener which handles basic functionality
     * of showing a default image until the network response is received, at which point
     * it will switch to either the actual image or the error image.
     * @param view The imageView that the listener is associated with.
     * @param defaultImageResId Default image resource ID to use, or 0 if it doesn't exist.
     * @param errorImageResId Error image resource ID to use, or 0 if it doesn't exist.
     */
    public static ImageListener getImageListener(final ImageView view,
            final int defaultImageResId, final int errorImageResId) {
        return new ImageListener() {
            @Override
            public void onErrorResponse(VolleyError error) {
                if (errorImageResId != 0) {
                    view.setImageResource(errorImageResId);
                }
            }

            @Override
            public void onResponse(ImageContainer response, boolean isImmediate) {
                if (response.getBitmap() != null) {
                    view.setImageBitmap(response.getBitmap());
                } else if (defaultImageResId != 0) {
                    view.setImageResource(defaultImageResId);
                }
            }
        };
    }
这里内部直接返回新建的ImageListenr对象,重写的回调方法分别对请求成功和失败的情况进行处理,请求成功后会会传回ImageContainer对象,通过该对象可以获取bitmap,从而直接将bitmap设置在ImageView控件中。
内部又定义了一个ImageContainer类,包含图片请求的所有数据:bitmap、imageListener、cacheKey和requestUrl 这里的核心类就是get方法,内部实现了三个get方法,最终都会调用如下方法:
public ImageContainer get(String requestUrl, ImageListener imageListener,
            int maxWidth, int maxHeight, ScaleType scaleType) {

        // only fulfill requests that were initiated from the main thread.
        throwIfNotOnMainThread();

        final String cacheKey = getCacheKey(requestUrl, maxWidth, maxHeight, scaleType);

        // Try to look up the request in the cache of remote images.
        Bitmap cachedBitmap = mCache.getBitmap(cacheKey);
        if (cachedBitmap != null) {
            // Return the cached bitmap.
            ImageContainer container = new ImageContainer(cachedBitmap, requestUrl, null, null);
            imageListener.onResponse(container, true);
            return container;
        }

        // The bitmap did not exist in the cache, fetch it!
        ImageContainer imageContainer =
                new ImageContainer(null, requestUrl, cacheKey, imageListener);

        // Update the caller to let them know that they should use the default bitmap.
        imageListener.onResponse(imageContainer, true);

        // Check to see if a request is already in-flight. 判断是否已经发送了该请求
        BatchedImageRequest request = mInFlightRequests.get(cacheKey);
        if (request != null) {
            // If it is, add this request to the list of listeners.
            request.addContainer(imageContainer);
            return imageContainer;
        }

        // The request is not already in flight. Send the new request to the network and
        // track it.
        Request<Bitmap> newRequest = makeImageRequest(requestUrl, maxWidth, maxHeight, scaleType,
                cacheKey);

        mRequestQueue.add(newRequest);
        mInFlightRequests.put(cacheKey,
                new BatchedImageRequest(newRequest, imageContainer));
        return imageContainer;
    }

    protected Request<Bitmap> makeImageRequest(String requestUrl, int maxWidth, int maxHeight,
            ScaleType scaleType, final String cacheKey) {
        return new ImageRequest(requestUrl, new Listener<Bitmap>() {
            @Override
            public void onResponse(Bitmap response) {
                onGetImageSuccess(cacheKey, response);
            }
        }, maxWidth, maxHeight, scaleType, Config.RGB_565, new ErrorListener() {
            @Override
            public void onErrorResponse(VolleyError error) {
                onGetImageError(cacheKey, error);
            }
        });
    }

    //BatchedImageRequest的具体实现
    private class BatchedImageRequest {
        /** The request being tracked */
        private final Request<?> mRequest;

        /** The result of the request being tracked by this item */
        private Bitmap mResponseBitmap;

        /** Error if one occurred for this response */
        private VolleyError mError;

        /** List of all of the active ImageContainers that are interested in the request */
        private final LinkedList<ImageContainer> mContainers = new LinkedList<ImageContainer>();

        /**
         * Constructs a new BatchedImageRequest object
         * @param request The request being tracked
         * @param container The ImageContainer of the person who initiated the request.
         */
        public BatchedImageRequest(Request<?> request, ImageContainer container) {
            mRequest = request;
            mContainers.add(container);
        }

        /**
         * Set the error for this response
         */
        public void setError(VolleyError error) {
            mError = error;
        }

        /**
         * Get the error for this response
         */
        public VolleyError getError() {
            return mError;
        }

        /**
         * Adds another ImageContainer to the list of those interested in the results of
         * the request.
         */
        public void addContainer(ImageContainer container) {
            mContainers.add(container);
        }

        /**
         * Detatches the bitmap container from the request and cancels the request if no one is
         * left listening.
         * @param container The container to remove from the list
         * @return True if the request was canceled, false otherwise.
         */
        public boolean removeContainerAndCancelIfNecessary(ImageContainer container) {
            mContainers.remove(container);
            if (mContainers.size() == 0) {
                mRequest.cancel();
                return true;
            }
            return false;
        }
    }
这里便处理了重复请求的过滤处理,具体执行流程分析如下: 1、判断是否在UI线程中,否则抛异常 2、根据请求url获取其存到缓存中的键值cacheKey 3、首先从cacheKey中判断是否已缓存中已存在当前的请求,如果存在,则采用缓存中的bitmap构建ImageContainer对象,并调用ImageListenr的onResponse回调方法,然后设置bitmap到inageview中 4、如果不存在,首先传入bitmap对象为null来构建ImageContainer对象,然后调用ImageListenr的onResponse回调方法,显示默认的bitmap 5、接着判断该url的请求是否已经发送,即in-flight,若request不为空,说明已发送,则将imageContainer对象添加到监听队列中 6、如果没有发送,即首次发送,则将请求添加到请求队列中
至此,便详细分析了整个加载图片的过程,既过滤了重复发送,又定义了图片显示,还有就是对于内存缓存,即一级缓存可以参照UIL的实现进行定义,这里附上一个简单的实现:
public class BitmapCache implements ImageLoader.ImageCache{

    private LruCache<String, Bitmap> mCache;

    private final String TAG = this.getClass().getSimpleName();

    public BitmapCache() {
        int maxSize = 10 * 1024 * 1024; // 4MiB
        mCache = new LruCache<String, Bitmap>(maxSize){
            @Override
            protected int sizeOf(String key, Bitmap value) {

                return value.getRowBytes() * value.getHeight();
            }
        };
    }

    @Override
    public void putBitmap(String url, Bitmap bitmap) {
        Log.v(TAG, "Added item to Mem Cache");
        mCache.put(url, bitmap);
    }

    @Override
    public Bitmap getBitmap(String url) {
        Log.v(TAG, "Retrieved item from Mem Cache");
        return mCache.get(url);
    }
}
以上便是对于ImageLoader的图片加载的分析过程
------------------------------------2016-03-24更新---------------------------------------------------
Volley的具体分析
我们在使用Volley时首先需要创建请求队列,即调用Volley.newRequestQueue(context),作为入口,我们来具体看一下代码内部实现:
//在Volley的内部,实现了4中newRequestQueue重写方法
    public static RequestQueue newRequestQueue(Context context) {
        return newRequestQueue(context, null);
    }

    public static RequestQueue newRequestQueue(Context context, HttpStack stack){
        return newRequestQueue(context, stack, -1);
    }

    public static RequestQueue newRequestQueue(Context context, int maxDiskCacheBytes) {
        return newRequestQueue(context, null, maxDiskCacheBytes);
    }

    /**
     * Creates a default instance of the worker pool and calls {@link RequestQueue#start()} on it.
     * You may set a maximum size of the disk cache in bytes.
     * @param context A {@link Context} to use for creating the cache dir.
     * @param stack An {@link HttpStack} to use for the network, or null for default.
     * @param maxDiskCacheBytes the maximum size of the disk cache, in bytes. Use -1 for default size.
     * @return A started {@link RequestQueue} instance.
     */
    public static RequestQueue newRequestQueue(Context context, HttpStack stack, int maxDiskCacheBytes) {
        File cacheDir = new File(context.getCacheDir(), DEFAULT_CACHE_DIR);
        //下面的代码是设置请求头User-Agent 字段,设置形式为packageName/versionCode,这一块是针对HttpClient的,HttpURLConnection 默认是有 User-Agent 的
        //这里注意在2.1后一种可以获取系统默认的User-Agent,另一种就是在自定义的Request中重写getHeaders方法设置User-Agent
        String userAgent = "volley/0";
        try {
            String packageName = context.getPackageName();
            PackageInfo info = context.getPackageManager().getPackageInfo(packageName, 0);
            userAgent = packageName + "/" + info.versionCode;
        } catch (NameNotFoundException e) {
        }
        //得到一个HttpStack,然后通过它构造一个代表网络的具体实现:BasicNetwork
        if (stack == null) {
            if (Build.VERSION.SDK_INT >= 9) {
                stack = new HurlStack();
            } else {
                // Prior to Gingerbread, HttpUrlConnection was unreliable.
                // See: http://android-developers.blogspot.com/2011/09/androids-http-clients.html
                //AndroidHttpClient在android5.0以后已经被移除了,所以只考虑使用HttpURLConnection对应的HurlStack
                //TODO 当然这里可以采用HttpClient来替代AndroidHttpClient  需要添加apache的httpclient的jar包
                /*HttpClient httpClient = new DefaultHttpClient();
                httpClient.getParams().setParameter(CoreProtocolPNames.USER_AGENT, userAgent);*/
                //TODO With httpcomponents 4.3 you should use the client builder to set the user agent
                HttpClient httpClient = HttpClients.custom().setUserAgent(userAgent).build();
                stack = new HttpClientStack(httpClient);
//                stack = new HttpClientStack(AndroidHttpClient.newInstance(userAgent));
            }
        }
        Network network = new BasicNetwork(stack);

        //构造一个代表缓存的基于Disk的具体实现DiskBasedCache,然后将网络对象和缓存对象传入构建一个RequestQueue,启动这个RequestQueue
        RequestQueue queue;
        if (maxDiskCacheBytes <= -1)
        {
            // No maximum size specified 没有指定最大硬盘缓存大小
            queue = new RequestQueue(new DiskBasedCache(cacheDir), network);
        }
        else
        {
            // Disk cache size specified
            queue = new RequestQueue(new DiskBasedCache(cacheDir, maxDiskCacheBytes), network);
        }
        //创建队列完成后,启动该队列
        queue.start();

        return queue;
    }
可以看到最终调用都会走到最后一个方法,该方法用于创建一个默认的请求队列,可以通过调用start方法启动请求。首先来看一下参数:第二个参数是HttpStack对象,HttpStack用于处理Http请求,返回请求结果的接口。目前Volley中的实现有基于HttpURLConnection的HurlStack和基于Apache HttpClient的HttpClientStack,对于这两个子类实现后面专门来说明。第三个参数用来设置磁盘缓存的最大字节,默认为-1。 代码分析:
1、首先看到对于User-Agent的设置。通过代码我们发现如果是使用 AndroidHttpClient,Volley 还会将请求头中的 User-Agent 字段设置为 App 的 ${packageName}/${versionCode},如果异常则使用 "volley/0",不过这个获取 User-Agent 的操作放到下面的 if else 内部更为合适。而对于 HttpURLConnection 却没有任何操作,为什么呢? 如果用 Fiddler 或 Charles 对数据抓包我们会发现,我们会发现 HttpURLConnection 默认是有 User-Agent 的,类似:
Dalvik/1.6.0 (Linux; U; Android 4.1.1; Google Nexus 4 - 4.1.1 - API 16 - 768x1280_1 Build/JRO03S)
在Android 2.1之后可以采用
String userAgent = System.getProperty("http.agent");
来得到系统默认的User-Agent,当然Volley也支持自定义User-Agent,这可以在自定义Request中重写getHeaders()方法:
@Override
public Map<String, String> getHeaders() throws AuthFailureError {
    // self-defined user agent
    Map<String, String> headerMap = new HashMap<String, String>();
    headerMap.put("User-Agent", "android-open-project-analysis/1.0");
    return headerMap;
}
2、如果HttpStack传入为null,则如果系统在 Gingerbread 及之后(即 API Level >= 9),采用基于 HttpURLConnection 的 HurlStack,如果小于 9,采用基于 HttpClient 的 HttpClientStack。(关于两者的区别,google的一篇博文描述的很详细)为什么呢?这时因为在 Froyo(2.2) 之前,HttpURLConnection 有个重大 Bug,调用 close() 函数会影响连接池,导致连接复用失效:通常的解决办法就是直接禁用掉连接池的功能
private void disableConnectionReuseIfNecessary() {
    // 这是一个2.2版本之前的bug
    if (Integer.parseInt(Build.VERSION.SDK) < Build.VERSION_CODES.FROYO) {
        System.setProperty("http.keepAlive", "false");
    }
}
所以在 Froyo 之前使用 HttpURLConnection(具体可参见博文)。另外在 Gingerbread(2.3) HttpURLConnection 默认开启了 gzip 压缩,即HttpURLConnection会自动在每个发出的请求中加入消息头:Accecpt-Encoping:gzip。配置web服务器来支持对客户端进行压缩的功能,从而可以改善性能,但是如果在压缩响应时出现问题,可以采用如下方式来禁用掉此功能:
urlConnection.setRequestProperty("Accept-Encoding", "identity"); Setting the Accept-Encoding request header explicitly disables automatic decompression and leaves the response headers intact; callers must handle decompression as needed, according to the Content-Encoding header of the response.
不过有一点要注意:如果启动了响应压缩的功能,http响应头里的Content-Length就会代表压缩后的长度,这时再使用getContentLength来获取解压后的数据就会出错,正确做法应该是一致调用InputStream.read()方法来读取响应数据,一直到出现-1为止 提高了 HTTPS 的性能,Ice Cream Sandwich(4.0) HttpURLConnection 支持了请求结果缓存。 在Android 2.3版本中还增加了一些HTTPS方面的改进,现在HttpsURLConnection会使用SNI(Server Name Indication)的方式进行连接,使得多个HTTPS主机可以共享同一个IP地址。除此之外,还增加了一些压缩和会话的机制。如果连接失败,它会自动去尝试重新进行连接。这使得HttpsURLConnection可以在不破坏老版本兼容性的前提下,更加高效地连接最新的服务器。 在Android 4.0版本中,我们又添加了一些响应的缓存机制。当缓存被安装后(调用HttpResponseCache的install()方法),所有的HTTP请求都会满足以下三种情况: 所有的缓存响应都由本地存储来提供。因为没有必要去发起任务的网络连接请求,所有的响应都可以立刻获取到。 视情况而定的缓存响应必须要有服务器来进行更新检查。比如说客户端发起了一条类似于 “如果/foo.png这张图片发生了改变,就将它发送给我” 这样的请求,服务器需要将更新后的数据进行返回,或者返回一个304 Not Modified状态。如果请求的内容没有发生,客户端就不会下载任何数据。 没有缓存的响应都是由服务器直接提供的。这部分响应会在稍后存储到响应缓存中。 由于这个功能是在4.0之后的版本才有的,通常我们就可以使用反射的方式来启动响应缓存功能。下面的示例代码展示了如何在Android 4.0及以后的版本中去启用响应缓存的功能,同时还不会影响到之前的版本:
private void enableHttpResponseCache() {
    try {
        long httpCacheSize = 10 * 1024 * 1024; // 10 MiB
        File httpCacheDir = new File(getCacheDir(), "http");
        Class.forName("android.net.http.HttpResponseCache")
            .getMethod("install", File.class, long.class)
            .invoke(null, httpCacheDir, httpCacheSize);
    } catch (Exception httpResponseCacheNotAvailable) {
    }
}
也应该同时配置一下你的Web服务器,在HTTP响应上加入缓存的消息头 再加上 HttpURLConnection 本身 API 相对简单,所以对 Android 来说,在 2.3 之后建议使用 HttpURLConnection,之前建议使用 AndroidHttpClient。这里要注意一点AndroidHttpClient在android5.0以后已经被移除了,所以针对这种情况有两种方法:一种是导入Apache的HttpClient相关的jar包,但是也要注意不同版本的实现方式可能不一样,比如下面就列出了两种实现方式:
//实现1
HttpClient httpClient = new DefaultHttpClient();
httpClient.getParams().setParameter(CoreProtocolPNames.USER_AGENT, userAgent);

//实现2 采用的是httpcomponents 4.3版本,需要使用client builder来设置
HttpClient httpClient = HttpClients.custom().setUserAgent(userAgent).build();
stack = new HttpClientStack(httpClient);
另一种是采用最新的OkHttp来实现,具体后面还会专门讲述,先略过~
3、接下来采用HttpStack对象实例化BasicNetwork,BasicNetwork类是Volley中默认的NetWork接口实现类,当然得益于Volley的高扩展性,这一块也是可以自定义的;其中重写了核心方法performRequest,用于执行请求的,后面也会对这块详细分析。
4、最后根据传入的磁盘缓存最大字节创建请求队列的实例。如果maxDiskCacheBytes <= -1,则不指定最大磁盘缓存,传入NetWork实例对象,构建请求队列实例;否则,根据传入的maxDiskCacheBytes和NetWork实例构建请求队列,然后调用队列的start的方法启动队列。
到这里关于Volley的请求队列创建方法已经分析完了,下面将针对其中涉及到的相关类进行展开分析
----------------------------------------------------2016-03-26更新 -----------------------------------------------
- 首先看一下HttpStack的两种方式之一的HurlStack,基于HttpURLConnection。主要用于执行请求,核心代码就是重写的performRequest实现,先来看一下源码:
@Override
public HttpResponse performRequest(Request<?> request, Map<String, String> additionalHeaders)
        throws IOException, AuthFailureError {
    String url = request.getUrl();
    HashMap<String, String> map = new HashMap<String, String>();
    map.putAll(request.getHeaders());
    map.putAll(additionalHeaders);
    if (mUrlRewriter != null) {
        String rewritten = mUrlRewriter.rewriteUrl(url);
        if (rewritten == null) {
            throw new IOException("URL blocked by rewriter: " + url);
        }
        url = rewritten;
    }
    URL parsedUrl = new URL(url);
    HttpURLConnection connection = openConnection(parsedUrl, request);
    for (String headerName : map.keySet()) {//添加请求属性
        connection.addRequestProperty(headerName, map.get(headerName));
    }
    setConnectionParametersForRequest(connection, request);
    // Initialize HttpResponse with data from the HttpURLConnection.
    ProtocolVersion protocolVersion = new ProtocolVersion("HTTP", 1, 1);
    int responseCode = connection.getResponseCode();
    if (responseCode == -1) {
        // -1 is returned by getResponseCode() if the response code could not be retrieved.
        // Signal to the caller that something was wrong with the connection.
        throw new IOException("Could not retrieve response code from HttpUrlConnection.");
    }
    //获取状态行:http协议版本、server发回的响应状态码、状态码的文本描述
    StatusLine responseStatus = new BasicStatusLine(protocolVersion,
            connection.getResponseCode(), connection.getResponseMessage());
    BasicHttpResponse response = new BasicHttpResponse(responseStatus);
    if (hasResponseBody(request.getMethod(), responseStatus.getStatusCode())) {
        response.setEntity(entityFromConnection(connection));
    }
    for (Entry<String, List<String>> header : connection.getHeaderFields().entrySet()) {
        if (header.getKey() != null) {
            Header h = new BasicHeader(header.getKey(), header.getValue().get(0));
            response.addHeader(h);
        }
    }
    return response;
}
参数包含泛型的request和额外的headers。 1、定义一个HashMap先将请求的header和传入的header添加进去 2、判断是否需要对url进行二次处理 3、接下来就是采用HttpURLConnection的常规操作,解析url输入流,将前面map中的headers添加到connection的请求属性中,并调用setConnectionParametersForRequest为请求设置连接参数,比如请求方法Content-Type等; 4、采用来自HttpURLConnection的数据初始化HttpResponse(Initialize HttpResponse with data from the HttpURLConnection.),获取状态行:http协议版本、server发回的响应状态码、状态码的文本描述;如果响应包含实体内容,则添加到响应实体中,然后返回响应
后面采用上面的stack构建BasicNetwork实例,这时可能有人会有疑问:既然前面已经做了请求处理,为何还要再构建一个BasicNetwork实例呢?回答这个问题之前,我们先来对比一个HulStack和BasicNetwork的继承关系:
HurlStack实现了HttpStack接口,HttpStack接口中只包含一个方法performRequest,该方法的返回值类型是HttpResponse,该接口主要包含了http协议响应报文所包含的基本内容:状态行(状态码,原因短语)以及实体等 BasicNetwork实现了Network接口,Network接口同样只包含一个同名的performRequest方法,不同的地方在于返回值类型是NetworkResponse,从构造方法参数可以看出public NetworkResponse(int statusCode, byte[] data, Map
简而言之就是,BasicNetwork是在HttpStack的基础上又做了一层封装,这样做保证了内层的HttpStack的代码的稳定性,同时增加了可扩展性。那接下来我们来详细看一下Basicwork的核心类performRequest的源码实现:
@Override
    public NetworkResponse performRequest(Request<?> request) throws VolleyError {
        long requestStart = SystemClock.elapsedRealtime();
        while (true) {
            HttpResponse httpResponse = null;
            byte[] responseContents = null;
            Map<String, String> responseHeaders = Collections.emptyMap();
            try {
                // Gather headers. 收集headers
                Map<String, String> headers = new HashMap<String, String>();
                //将从缓存中获取的If-None-Match和If-Modified-Since条件头部信息重新赋值给headers,然后通过HttpStack进行请求验证
                addCacheHeaders(headers, request.getCacheEntry());//这里采用If-None-Match和If-Modified-Since对过期缓存或者不新鲜缓存,进行请求再验证
                //调用HttpStack执行请求
                httpResponse = mHttpStack.performRequest(request, headers);
                //获取状态码
                StatusLine statusLine = httpResponse.getStatusLine();
                int statusCode = statusLine.getStatusCode();
                //获取headers
                responseHeaders = convertHeaders(httpResponse.getAllHeaders());
                // Handle cache validation.  304  处理缓存验证
                //服务端根据请求时通过If-Modified-Since首部传过来的时间,判断资源文件是否在If-Modified-Since时间以后有改动,
                //如果有改动,返回新的请求结果。如果没有改动,返回 304 not modified
                //Last-Modified代表了资源文件的最后修改时间。通常使用这个首部构建If-Modified-Since的时间,两者是配合使用的
                //Date表示响应产生的时间,正常情况下Date时间在Last-Modified时间之后。也就是Date>=Last-Modified
                //Server端采用直接判断服务器资源文件修改时间,是否和If-Modified-Since所传时间相等,那么这种情况只能使用Last-Modified来作为If-Modified-Since的value值进行判断
                if (statusCode == HttpStatus.SC_NOT_MODIFIED) {//返回304,表明自指定日期之后,文档没有被修改过

                    Entry entry = request.getCacheEntry();
                    if (entry == null) {
                        return new NetworkResponse(HttpStatus.SC_NOT_MODIFIED, null,
                                responseHeaders, true,
                                SystemClock.elapsedRealtime() - requestStart);
                    }

                    // A HTTP 304 response does not have all header fields. We
                    // have to use the header fields from the cache entry plus
                    // the new ones from the response.
                    // http://www.w3.org/Protocols/rfc2616/rfc2616-sec10.html#sec10.3.5
                    entry.responseHeaders.putAll(responseHeaders);
                    return new NetworkResponse(HttpStatus.SC_NOT_MODIFIED, entry.data,
                            entry.responseHeaders, true,
                            SystemClock.elapsedRealtime() - requestStart);
                }

                // Handle moved resources  301 302  处理变动资源,如重定向
                if (statusCode == HttpStatus.SC_MOVED_PERMANENTLY || statusCode == HttpStatus.SC_MOVED_TEMPORARILY) {
                    String newUrl = responseHeaders.get("Location");
                    request.setRedirectUrl(newUrl);
                }

                // Some responses such as 204s do not have content.  We must check.  不包含内容的,需要检查
                if (httpResponse.getEntity() != null) {
                  responseContents = entityToBytes(httpResponse.getEntity());
                } else {
                  // 对于无内容返回的请求,添加一个0字节的返回内容
                  // Add 0 byte response as a way of honestly representing a
                  // no-content request.
                  responseContents = new byte[0];
                }

                // if the request is slow, log it.
                long requestLifetime = SystemClock.elapsedRealtime() - requestStart;
                logSlowRequests(requestLifetime, request, responseContents, statusLine);

                if (statusCode < 200 || statusCode > 299) {
                    throw new IOException();
                }
                //如果改动过,则返回新的响应内容
                return new NetworkResponse(statusCode, responseContents, responseHeaders, false,
                        SystemClock.elapsedRealtime() - requestStart);
            } catch (SocketTimeoutException e) {
                attemptRetryOnException("socket", request, new TimeoutError());
            } catch (ConnectTimeoutException e) {
                attemptRetryOnException("connection", request, new TimeoutError());
            } catch (MalformedURLException e) {
                throw new RuntimeException("Bad URL " + request.getUrl(), e);
            } catch (IOException e) {
                int statusCode = 0;
                NetworkResponse networkResponse = null;
                if (httpResponse != null) {
                    statusCode = httpResponse.getStatusLine().getStatusCode();
                } else {
                    throw new NoConnectionError(e);
                }
                if (statusCode == HttpStatus.SC_MOVED_PERMANENTLY ||
                        statusCode == HttpStatus.SC_MOVED_TEMPORARILY) {
                    VolleyLog.e("Request at %s has been redirected to %s", request.getOriginUrl(), request.getUrl());
                } else {
                    VolleyLog.e("Unexpected response code %d for %s", statusCode, request.getUrl());
                }
                if (responseContents != null) {
                    networkResponse = new NetworkResponse(statusCode, responseContents,
                            responseHeaders, false, SystemClock.elapsedRealtime() - requestStart);
                    if (statusCode == HttpStatus.SC_UNAUTHORIZED ||
                            statusCode == HttpStatus.SC_FORBIDDEN) {
                        attemptRetryOnException("auth",
                                request, new AuthFailureError(networkResponse));
                    } else if (statusCode == HttpStatus.SC_MOVED_PERMANENTLY ||
                                statusCode == HttpStatus.SC_MOVED_TEMPORARILY) {
                        attemptRetryOnException("redirect",
                                request, new RedirectError(networkResponse));
                    } else {
                        // TODO: Only throw ServerError for 5xx status codes.
                        throw new ServerError(networkResponse);
                    }
                } else {
                    throw new NetworkError(e);
                }
            }
        }
    }
上述代码中做了比较详细的注释,就不一步步的解释了,只讲述一下其中比较重要的点:
1、addCacheHeaders方法实现了缓存再验证,这里采用了条件请求(形如 If-xxx 这种样式的请求首部字段,都可称为条件请求),这里采用了双重验证即If-Modified-Since和If-None-Match来保证缓存文件是否被修改过,若是,则返回新的文本,否则,返回304 Not Modified。
If-Modified-Since 用于确认代理或客户端拥有的本地资源的有效性。获取资源的更新日期时间,可通过确认首部字段 Last-Modified 来确定。原始服务器会将文档最后修改的日期附上。If-Modified-Since
private void addCacheHeaders(Map<String, String> headers, Cache.Entry entry) {
        // If there's no cache entry, we're done.
        if (entry == null) {
            return;
        }

        if (entry.etag != null) {//If-None-Match:表示如果提供的实体标记与当前文档的实体标记不符,就获取文档  ETag:实体标签(版本标识符)
            headers.put("If-None-Match", entry.etag);
        }

        if (entry.lastModified > 0) {//If-Modified-Since:表示除非在某个指定的日期之后资源被修改过,否则就限制这个请求
            Date refTime = new Date(entry.lastModified);
            headers.put("If-Modified-Since", DateUtils.formatDate(refTime));
        }
    }
2、后面分别对不同的返回响应码做了相应处理,包括304、302、301、2xx等,然后返回NetworkResponse实例。
- 最后就是根据最大缓存字节以及前面的network实例构建请求队列,并启动队列。关键就是start方法:
public void start() {
        stop();  // Make sure any currently running dispatchers are stopped.
        // Create the cache dispatcher and start it.  创建缓存分发调度线程,并启动它
        mCacheDispatcher = new CacheDispatcher(mCacheQueue, mNetworkQueue, mCache, mDelivery);
        mCacheDispatcher.start();

        // Create network dispatchers (and corresponding threads) up to the pool size.
        for (int i = 0; i < mDispatchers.length; i++) {
            //NetworkDispatcher继承于Thread,是一个线程,执行时调用start
            NetworkDispatcher networkDispatcher = new NetworkDispatcher(mNetworkQueue, mNetwork,
                    mCache, mDelivery);
            mDispatchers[i] = networkDispatcher;//将网络分发放入缓存分发
            networkDispatcher.start();
        }
    }
开启一个缓存调度线程和n个网络调度线程,一般默认为4,这样在后台默认就会同时存在5个线程运行。这块的并发数根据cpu核数以及网络类型计算更为合适的并发数。缓存调度线程不断的从缓存请求队列中取出 Request去处理,网络调度线程不断的从网络请求队列中取出 Request 去处理。可以看到在start方法中会分别调用缓存调度CacheDispatcher和网络调度NetworkDispatcher,这两个类都是继承于Thread类,可知都为线程子类实现,下面从源码实现上来看一下NetworkDispatcher的核心方法run:
@Override
    public void run() {
        //设置线程优先级

        Process.setThreadPriority(Process.THREAD_PRIORITY_BACKGROUND);
        Request<?> request;
        while (true) {
            long startTimeMs = SystemClock.elapsedRealtime();
            // release previous request object to avoid leaking request object when mQueue is drained.
            //释放之前的请求对象,避免泄露
            request = null;
            try {
                // Take a request from the queue.  从传入的请求队列中获取request
                request = mQueue.take();
            } catch (InterruptedException e) {
                // We may have been interrupted because it was time to quit.
                if (mQuit) {
                    return;
                }
                continue;
            }

            try {
                request.addMarker("network-queue-take");

                // If the request was cancelled already, do not perform the
                // network request.
                if (request.isCanceled()) {
                    request.finish("network-discard-cancelled");
                    continue;
                }

                addTrafficStatsTag(request);

                // Perform the network request.  这一步会调用实现NetWork接口的子类BasicNetwork的performRequest方法去请求接口
                NetworkResponse networkResponse = mNetwork.performRequest(request);
                request.addMarker("network-http-complete");

                // If the server returned 304 AND we delivered a response already,
                // we're done -- don't deliver a second identical response.
                if (networkResponse.notModified && request.hasHadResponseDelivered()) {
                    request.finish("not-modified");
                    continue;
                }

                // Parse the response here on the worker thread.
                Response<?> response = request.parseNetworkResponse(networkResponse);
                request.addMarker("network-parse-complete");

                // Write to cache if applicable.
                // TODO: Only update cache metadata instead of entire record for 304s.
                if (request.shouldCache() && response.cacheEntry != null) {
                    mCache.put(request.getCacheKey(), response.cacheEntry);
                    request.addMarker("network-cache-written");
                }

                // Post the response back.
                request.markDelivered();
                mDelivery.postResponse(request, response);
            } catch (VolleyError volleyError) {
                volleyError.setNetworkTimeMs(SystemClock.elapsedRealtime() - startTimeMs);
                parseAndDeliverNetworkError(request, volleyError);
            } catch (Exception e) {
                VolleyLog.e(e, "Unhandled exception %s", e.toString());
                VolleyError volleyError = new VolleyError(e);
                volleyError.setNetworkTimeMs(SystemClock.elapsedRealtime() - startTimeMs);
                mDelivery.postError(request, volleyError);
            }
        }
    }
附:这里我之前有一个疑问就是调用Thread的start方法会回调run方法,那调用的入口究竟在哪呢?这里参考stackoverflow上的一个解答:
If you directly call run() method, you are not using multi-threading feature since run() method is executed as part of caller thread. If you call start() method on Thread, Java Virtual Machine will call run() method and two threads will run concurrently now - Current Thread (main() in your example) and Other Thread ( Runnable r1 in your example)
下面来看一下在Thread类中start的源码:
/**
     * Causes this thread to begin execution; the Java Virtual Machine
     * calls the <code>run</code> method of this thread.
     * <p>
     * The result is that two threads are running concurrently: the
     * current thread (which returns from the call to the
     * <code>start</code> method) and the other thread (which executes its
     * <code>run</code> method).
     * <p>
     * It is never legal to start a thread more than once.
     * In particular, a thread may not be restarted once it has completed
     * execution.
     *
     * @exception  IllegalThreadStateException  if the thread was already
     *               started.
     * @see        #run()
     * @see        #stop()
     */
    public synchronized void start() {
        /**
         * This method is not invoked for the main method thread or "system"
         * group threads created/set up by the VM. Any new functionality added
         * to this method in the future may have to also be added to the VM.
         *
         * A zero status value corresponds to state "NEW".
         */
        if (threadStatus != 0)
            throw new IllegalThreadStateException();
        group.add(this);
        start0();
        if (stopBeforeStart) {
            stop0(throwableFromStop);
        }
    }

    private native void start0();
在上述代码中可能没有看到哪里直接触发run方法的调用实际上最后一句private native void start0();就是负责调用run方法的。这时native方法,即采用C++实现的,有java虚拟机负责执行。至此便可以明白start和run方法的关联了。
接着前面的分析,内部采用了无限循环,不断从请求队列中取出请求,在request的不同阶段设置一个标记,调用实现NetWork接口的子类BasicNetwork的performRequest方法去请求接口,然后调用request的parseNetworkResponse解析响应,最后调用响应分发器ResponseDelivery的方法postResponse提交response,具体实现是调用的ResponseDelivery的子类实现ExecutorDelivery,即接口请求结果的具体实现类。该类的实例是在构建NetworkDispatcher和CacheDispatcher作为参数传入的,在 Handler对应线程中传输缓存调度线程或者网络调度线程中产生的请求结果或请求错误,会在请求成功的情况下调用Request.deliverResponse(…) 函数,失败时调用 Request.deliverError(…) 函数,具体会回调Request的具体实现类的deliverResponse方法,比如StringRequest方法。
至此,整个Volley的工作过程已经结合源码实现进行了分析,相信对于Volley整个框架的设计有了更为清晰的认识。